Working RESTful API for Sitecore ItemServices gets easier with Postman.
Prerequisites
- Download the latest version of Postman from here. I highly recommend Signing up to keep your Collections in sync.
- Enable SSL on the CMS environment. You can create a self signed certificate on the CMS environment and add an HTTPS binding

- Update Policy Setting in the App_Config/include/Sitecore.Services.client.config file to grant remote access to ItemService from Postman outside your CM server, by setting it to “Sitecore.Services.Infrastructure.Web.Http.Security.ServicesOnPolicy“. You can read more about this in Sitecore Documentation.

- For older versions of Postman, you may need to install Chrome Extension “Postman Interceptor” and enable Interceptor from Postman

Establishing Connection
The first step into establishing a connection is to Authenticate the REST API. For this, you can setup a new request in Postman as shown below:

Here are the Request Details:
- URL: https://{CM Server URL}/sitecore/api/ssc/auth/login
- Method: POST
- Header: Content-Type: application/json
- Body:
{
“domain”:”sitecore”,
“username”:”Type your username goes here”,
“password”:”Type your password here”
}
Please remember the following:
- Ensure that the Authentication URL is HTTPS. However, once Authentication is successful, you can make requests using HTTP.
- Ensure that the “Content-Type” is set to “Application/json” in the Request Header:

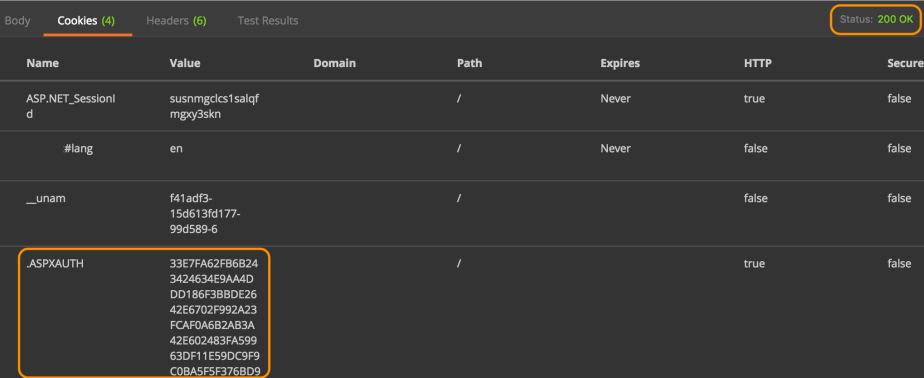
- If the Authentication is successful, you will receive 200 response with a cookie “.ASPXAUTH”. This cookie will play a crucial role in performing additional authentication requests in Postman. Postman will take care of sending this cookie in the request header for subsequent request from the same domain.
Making your First Request
Request #1:
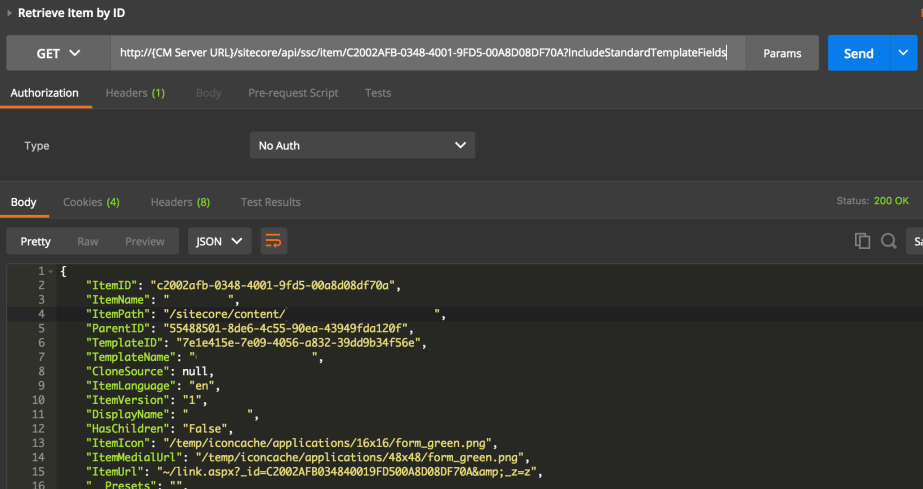
Retrieve Sitecore Item details by ID
Request Details:
- URL: http://{CM Server URL}/sitecore/api/ssc/item/{Item ID goes here}?IncludeStandardTemplateFields
- Method: GET
- Header: Content-Type: application/json
Now you can proceed to perform additional Sitecore operations like Create/Edit/Delete items, fetch children items etc.
Request #2:
Retrieve Sitecore Item Children by ID
Request Details:
- URL: http://{CM Server URL}/sitecore/api/ssc/item/{Item ID goes here}/children?IncludeStandardTemplateFields
- Method: GET
- Header: Content-Type: application/json
Request #3:
Edit Sitecore Item by ID
Request Details:
- URL: http://{CM Server URL}/sitecore/api/ssc/item/{Item ID goes here}
- Method: PATCH
- Header: Content-Type: application/json
- Body:
{
“__workflow state”:”guid of the workflow state item goes here”,
“ItemName”:”Item name goes here”,
“DisplayName”:”Display name goes here”
}
Request #4:
Delete Sitecore Item by ID
Request Details:
- URL: http://{CM Server URL}/sitecore/api/ssc/item/{Item ID goes here}
- Method: DELETE
- Header: Content-Type: application/json
Request #5:
Logout from REST API
Request Details:
- URL: http://{CM Server URL}/sitecore/api/ssc/auth/logout
- Method: POST
- Header: Content-Type: application/json
